Recording game clips on Windows 11 is a fantastic way to capture your gaming moments and share them with friends or on social media. With the built-in Xbox Game Bar, Windows 11 makes it easy to record gameplay without the need for third-party software. In this article, we’ll explore the necessary steps and tips to effectively record game clips, troubleshoot common issues, and optimize your system for the best performance.
Windows 11 Overview
Windows 11 is the latest operating system from Microsoft, designed to enhance user experience with a modern interface and improved performance. It offers gamers a robust platform to enjoy their favorite titles, featuring integrated tools like the Xbox Game Bar. Understanding the features of Windows 11 can help users maximize their gaming experience, including how to efficiently record gameplay.
Xbox Game Bar Features
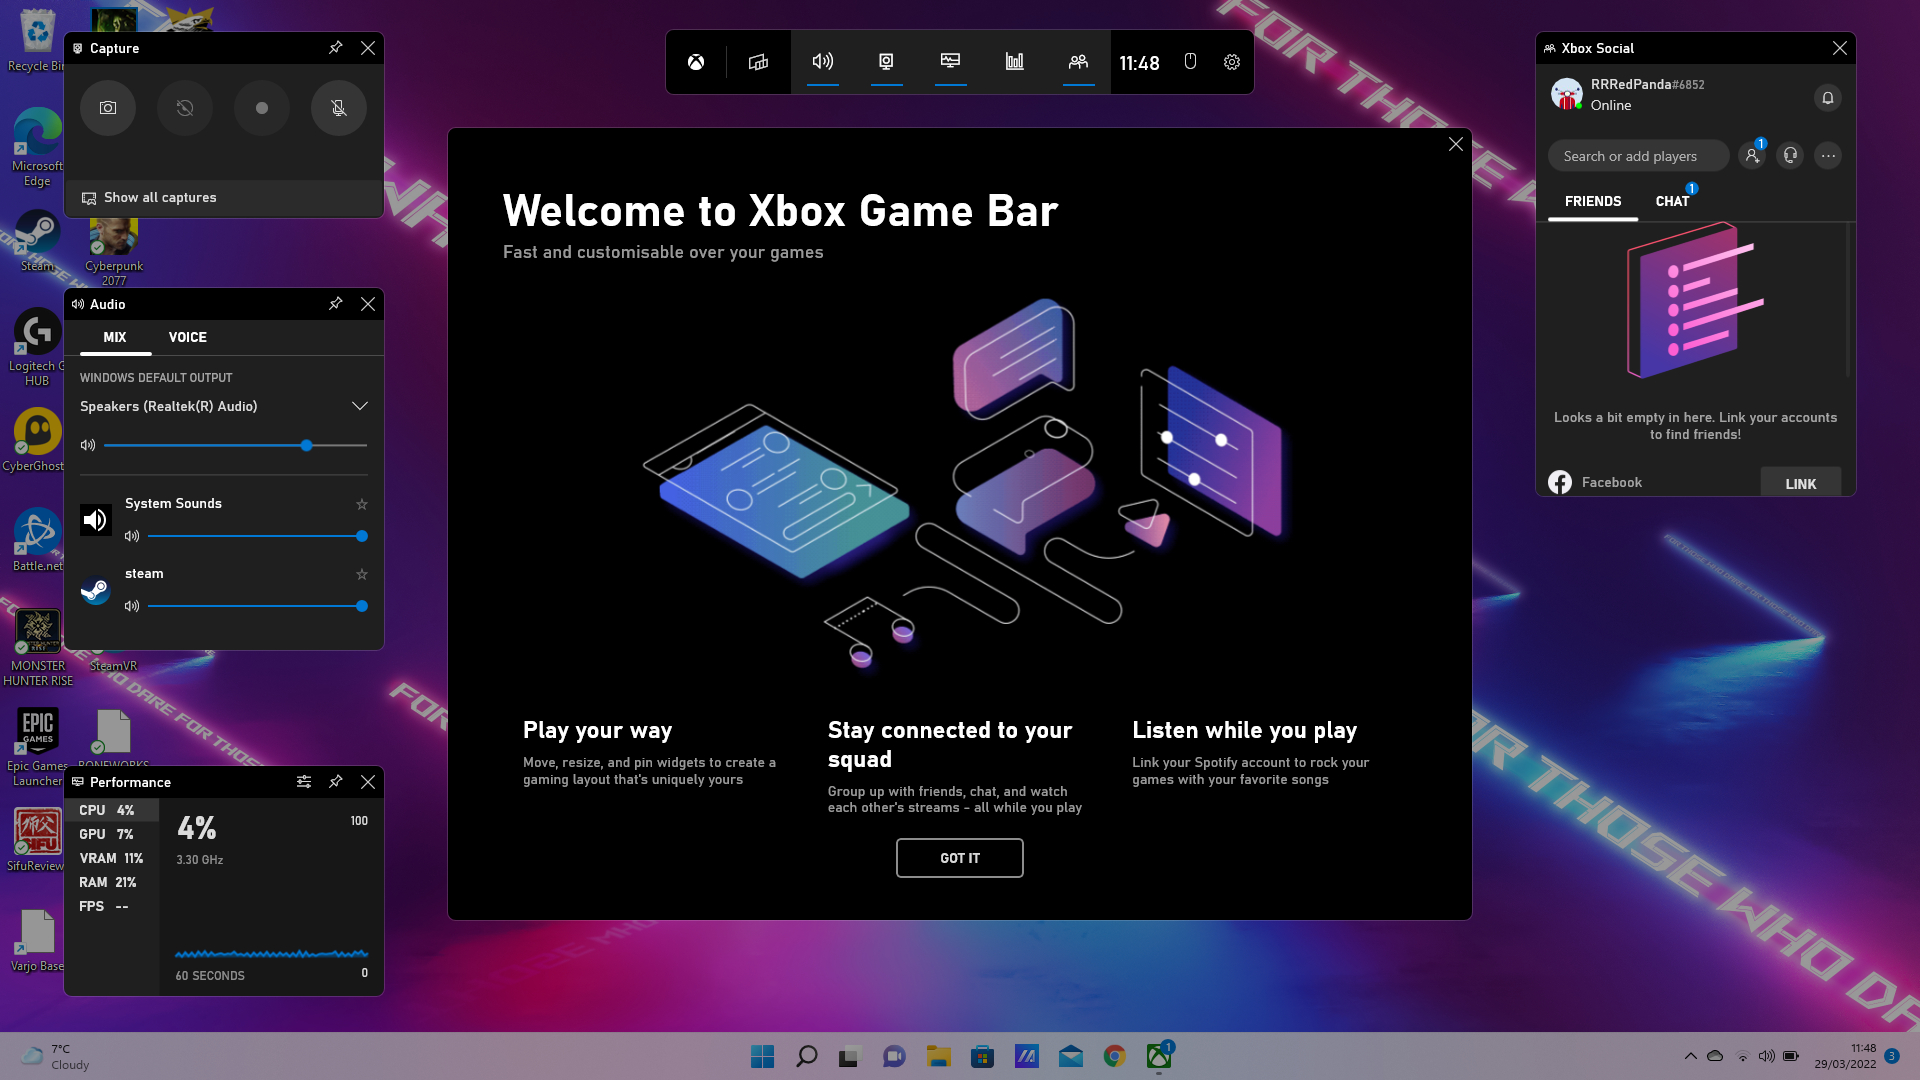
The Xbox Game Bar is a powerful tool integrated into Windows 11 that allows users to capture screenshots, record game clips, and stream gameplay. It features an intuitive overlay that provides quick access to performance metrics, audio settings, and social features. Familiarizing yourself with the Game Bar’s capabilities will enhance your ability to record and share your gaming highlights.
Recording Settings Configuration
Before you start recording, it’s essential to configure the settings within the Xbox Game Bar. Access the settings by pressing Windows + G to open the Game Bar, then navigate to the settings menu. Here, you can adjust video quality, frame rate, and audio settings to ensure your recordings meet your desired standards. Proper configuration helps in achieving optimal recording quality without overloading your system.
How to Start Recording
To record your gameplay, launch the game you want to capture and then press Windows + G to bring up the Game Bar. Click on the “Record” button or use the shortcut Windows + Alt + R to start recording. This will capture your gameplay in real-time. Remember to stop the recording by pressing the same keys again. The clips will be saved automatically in your designated folder, usually under “Videos” in the “Captures” subfolder.
Editing Game Clips
After recording your gameplay, you might want to edit your clips before sharing them. Windows 11 provides built-in editing tools through the Photos app, allowing you to trim, cut, and enhance your recordings. You can also add music or text overlays for a more polished final product. Editing helps in creating engaging content that highlights the best moments of your gameplay.
Troubleshooting Recording Issues
Sometimes, users may encounter issues while recording game clips, such as the Game Bar not opening or recordings not saving. Common troubleshooting steps include ensuring that your graphics drivers are up to date, checking the Xbox Game Bar settings, and verifying that your game is supported by the Game Bar. If problems persist, restarting your PC or resetting the Game Bar can often resolve these issues.
Performance Optimization for Recording
To ensure smooth recording and gameplay, optimizing your system’s performance is crucial. Close unnecessary background applications to free up resources, and consider adjusting your game settings for better performance. You can also tweak the Xbox Game Bar settings to lower the recording quality if your system struggles with higher settings. These optimizations help in achieving a seamless recording experience without lag.
| Tip | Details | Action Required | Frequency | Notes |
|---|---|---|---|---|
| Configure Settings | Adjust video quality and audio settings | Check before recording | Every session | Higher quality may need more resources |
| Check System Performance | Monitor CPU and GPU usage | Use Task Manager | As needed | Close unnecessary apps for better performance |
| Update Drivers | Ensure graphics drivers are current | Check manufacturer’s website | Regularly | Outdated drivers can cause issues |
| Use Editing Tools | Edit clips for better presentation | Utilize Photos app | After recording | Enhance clips before sharing |
Recording game clips on Windows 11 using Xbox.com is a straightforward process that allows gamers to capture their best moments. By understanding the features of Windows 11 and the Xbox Game Bar, configuring your settings correctly, and optimizing your system performance, you can create high-quality recordings with ease. Whether you’re sharing your achievements or just looking to preserve your gameplay, these tips will help you make the most of your recording experience.
FAQs
How do I access the Xbox Game Bar on Windows 11?
You can access the Xbox Game Bar by pressing Windows + G while in a game. This will open the Game Bar overlay, giving you access to recording and other features.
Can I record gameplay from any game?
Most modern games support recording with the Xbox Game Bar. However, some games may restrict this feature. Check the game’s compatibility with the Game Bar for specific details.
What file format are recorded clips saved in?
Recorded clips are typically saved in MP4 format, which is widely compatible with various media players and editing software.
How can I change the location where recordings are saved?
You can change the save location by going to the Xbox Game Bar settings and adjusting the “Captures” folder path in the “Game Capturing” section.
Is there a limit to how long I can record gameplay?
Yes, there is a maximum recording length, which is usually set to 4 hours. However, you can change this limit in the Game Bar settings if you prefer shorter clips.